Tutorials:
How to Use Dev-cpp with opencv Version 2.2 and opencv Version 2.3 in Windows
Hi, and welcome to the tutorial on how to use devcpp with opencv in windows. Now when i had to shift my IDE from MS VS 2010 to dev cpp, i was unable to locate any single good tutorial that would tell me how to do this, hence i decided that i should provide such a resource which is very useful given how lightweight dev-cpp is as compared to the Visual Studio.
Pre-Requisites
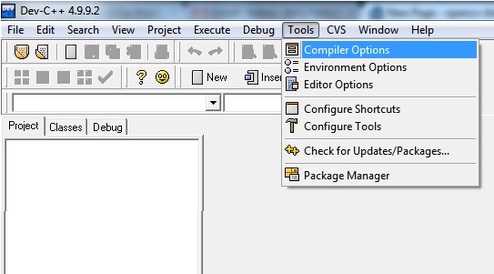
So first thing you have to do is download and install dev-cpp. Now i have used version 4.9.9.2 of Dev-Cpp which is available here. Once you have downloaded the IDE and installed it , double click on the dev-cpp icon (a shortcut to which might have been placed on your desktop, or navigate through it from the 'start' menu,Also you will need opencv. I have tested these settings and know them to work for opencv version 2.2 and version 2.3 which can be downloaded from here. Please download the .exe package as even though it says visual studio (ignore that)..Now, firstly you will have to perform some settings that will enable you to try compile programs using opencv code.So lets begin.Now that youve opened up your dev-cpp IDE, go to the Tools menu and Select Compiler Options
Pre-Requisites
So first thing you have to do is download and install dev-cpp. Now i have used version 4.9.9.2 of Dev-Cpp which is available here. Once you have downloaded the IDE and installed it , double click on the dev-cpp icon (a shortcut to which might have been placed on your desktop, or navigate through it from the 'start' menu,Also you will need opencv. I have tested these settings and know them to work for opencv version 2.2 and version 2.3 which can be downloaded from here. Please download the .exe package as even though it says visual studio (ignore that)..Now, firstly you will have to perform some settings that will enable you to try compile programs using opencv code.So lets begin.Now that youve opened up your dev-cpp IDE, go to the Tools menu and Select Compiler Options
Now you will see before you a 'Compiler Options' Dialog Box and using this we are going to define a new compiler that can make use of opencv Libraries etc.
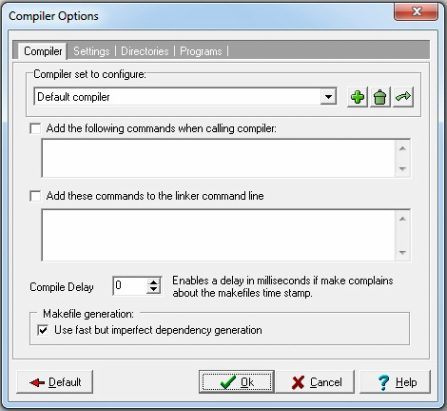
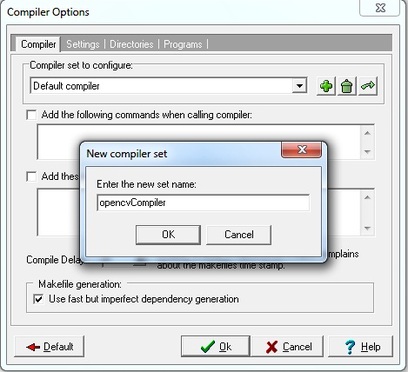
Ok, so now click on the '+' button in front of where it says 'Default Compiler' and a 'New compiler set' dialog box will appear. Now give it any name that you want, i've named my compiler 'opencvCompiler' and then click on OK
Now go to the Directories tab by clicking on it and then go to the Libraries tab by clicking on it.
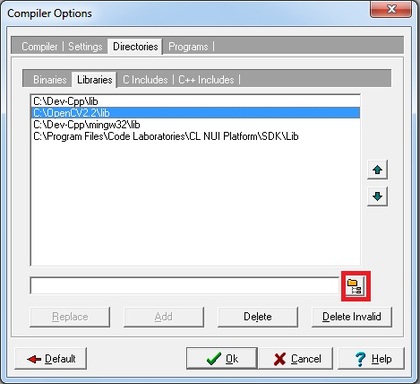
Now click on the button that i have marked with a red square and then navigate to where you have stored opencv on your computer. In my case, i installed opencv on my C:\ drive. Once you have reached the opencv directory inside there is a directory called 'lib' click on it and click 'OK', now the path you want to add is appearing in the text box next to the button marked with a red square. Now click on the 'Add' button which becomes activated and this path will be included and will appear like the highlited path in the image above.
Now i have used opencv Version 2.2, but this works perfectly fine with opencv Version 2.3. I have tested it.
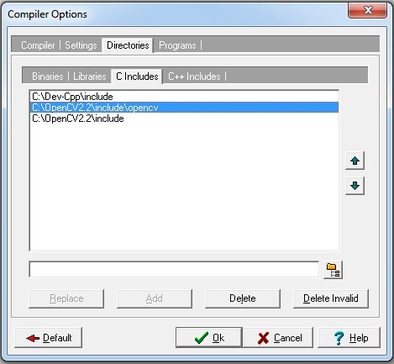
Next i want you to click on C Includes and add the following two paths in the same way
C:\OpenCV2.2\include
and
C:\OpenCV2.2\include\opencv
if the folders are stored in Program Files then your paths will look like this.
C:\Program Files\OpenCV2.2\include
and
C:\Program Files\OpenCV2.2\include\opencv
Now i have used opencv Version 2.2, but this works perfectly fine with opencv Version 2.3. I have tested it.
Next i want you to click on C Includes and add the following two paths in the same way
C:\OpenCV2.2\include
and
C:\OpenCV2.2\include\opencv
if the folders are stored in Program Files then your paths will look like this.
C:\Program Files\OpenCV2.2\include
and
C:\Program Files\OpenCV2.2\include\opencv
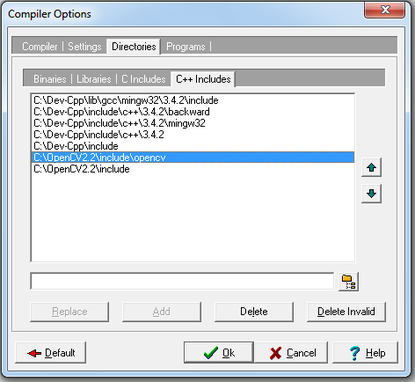
Now add the very same two paths to the C++ Includes, it should look like this once youre done
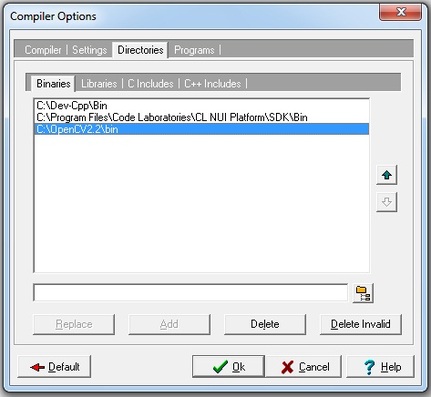
Ok, great, now add the path to the 'bin' folder in the 'Binaries' tab.
Great Now, return to the Compiler Tab and add the following pre-compile directives as shown. Now the naming of these directives is based on your version of opencv.
-lopencv_core220d
-lopencv_highgui220d
-lopencv_video220d
-lopencv_ml220d
-lopencv_legacy220d
-lopencv_imgproc220d
if youre using opencv 2.3 then it should look like this
-lopencv_core230d
-lopencv_highgui230d
-lopencv_video230d
-lopencv_ml230d
-lopencv_legacy230d
-lopencv_imgproc230d
-lopencv_core220d
-lopencv_highgui220d
-lopencv_video220d
-lopencv_ml220d
-lopencv_legacy220d
-lopencv_imgproc220d
if youre using opencv 2.3 then it should look like this
-lopencv_core230d
-lopencv_highgui230d
-lopencv_video230d
-lopencv_ml230d
-lopencv_legacy230d
-lopencv_imgproc230d
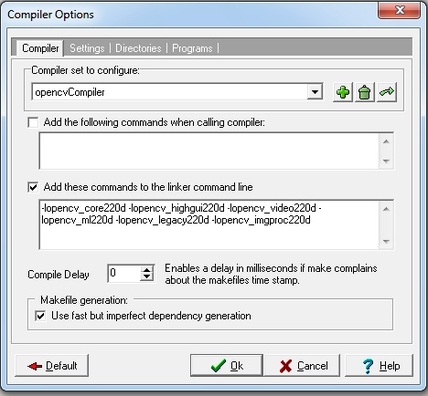
Now dont forget to check the box that says 'Add these commands to the linker command line'
Now press Ok and you have successfully created a compiler for the dev-cpp that can use opencv Programs.
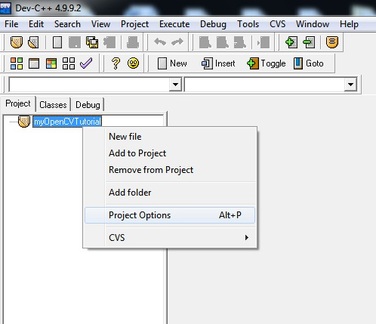
Now Create a new Empty Project, and Select to the Project Options by right clicking on the project icon in the Projects Tab.
Now press Ok and you have successfully created a compiler for the dev-cpp that can use opencv Programs.
Now Create a new Empty Project, and Select to the Project Options by right clicking on the project icon in the Projects Tab.
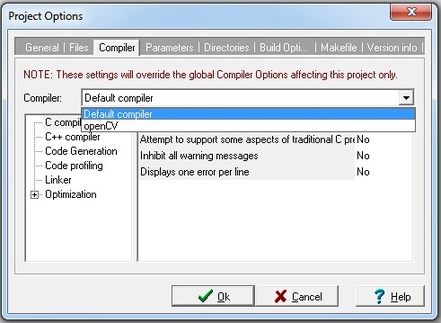
And Finally now in the dialog Box that appears , go to the Compilers tab and change your compiler to whatever you named it.. i normally use the compiler i defined as opencv, so Select your newly defined compiler and click Ok
Congratulations, you have successfully Set up your IDE for work in devcpp :D
Hope this was helpful..
Hope this was helpful..
